Monday, November 7, 2011

If I were Italian

If I were an Italian man, this would be called  Gianduja-Stracciatella.  Fortunately, Chocolate Hazelnut Ice Cream with Chocolate Ribbon is easier to say.  Well, for me anyway.  It was pretty labor intensive, but well worth it for the amount of flavor packed into it.


There's a cream of toasted hazelnuts, home made milk chocolate ganache, and a dark chocolate "ribbon" created by drizzling melted chocolate into the churning ice cream at the very last minute.


One neat thing I learned was that if you don't have whole milk, you can substitute 1.5 tablespoons of heavy cream and add skim milk to make 1 cup of whole milk.

Thursday, September 29, 2011

The Muffin Man

If you go to your local coffee shop and order a muffin, you'll more than likely get a giant, sugary confection that closely resembles a cupcake without any frosting.  There is (or at least should be) a big difference between a muffin and a cupcake though.  A cupcake should be sweeter and lighter than a muffin.  Muffins are more dense, less sweet, and chewier.

The method for making the two are completely different as well.  A muffin is really a quickbread.  A cupcake is a cake that long, long ago would've been baked in an earthenware mug on the side of the hearth.

Anyway, the other night we had chocolate chip muffins.

The muffin method involves mixing all of your dry ingredients in one bowl and all of the wet ingredients in another.

For the dry goods  in our muffins, we mix All purpose flour, baking powder, baking soda and salt.

For the wet goods, we have Sugar, oil, egg, egg yolk and yogurt.

When I mix the wet goods, I start with the egg and egg yolk.  I whisk them together until everything is homogenous, then I whisk in the sugar to form a paste.  Then the oil gets drizzled in and then finally the yogurt.  When all is said and done, everything is nicely incorporated and evenly distributed.  Whisking the eggs first gives us plenty of emulsifiers.

Next, as with our pancakes earlier, we add the wet ingredients to the dry.  Then our mix-ins...in this case the chocolate chips go for a dip.

Mix everything just to combine.  Don't overwork the flour or you'll produce excess gluten and the muffins will be way too tough and chewy.  Some lumps are OK.  They'll bake out.

Using a disher to fill the pan will ensure that we get even amounts of batter in each cup.  This means that all of the muffins will cook evenly.  No tiny burnt muffins or big, uncooked muffins to be had!

As a test, I sprinkled just a bit of sugar over 3 of the muffins (the three on the left in the picture above) before they went into the oven.

After they came out, they looked like this


The exterior is crusty, the inside is dense and just dry enough to justify slathering on some butter!

Ingredients (dry)
303 g All purpose Flour
10 g baking powder
6 g baking soda
pinch of kosher salt

Ingredients (wet)
105 g sugar
1/2 cup vegetable oil
1 egg + 1 egg yolk
1 cup plain yogurt

1 cup chocolate chips

Monday, September 12, 2011

Meat and Potatoes

I wanted to try something new this past weekend.  I'd never made a wine reduction sauce, so I thought I'd give it a whirl.  What is a red wine reduction sauce good for?  Steak!  But you can't just serve a chunk of steak for dinner (our low carb days are long past).  Steak and potatoes became the order of the day.

I decided on a potato gratin to accompany the steak, and grill-roasted zucchini and yellow squash to go along side.

I sliced the potatoes thin on a mandoline.

I am the first person ever to make that joke.


I sliced about 3 lbs of potatoes.  They went into a pot with cream, garlic, salt, pepper and just a touch of nutmeg.


I put that on the stove top to heat up and in the mean time, grated a cup of Emmentaler cheese.  Emmentaler is a cheese from switzerland, but a bit stronger than the usual 'Swiss Cheese' we're used to.  When the cream started to boil I poured everything out of the pot and into a 13X9 baking dish, then topped with the cheese.
Into the oven at 400 degrees Fahrenheit for about 35-40 minutes.

While that was in the oven, I tossed a bunch of aromatics into the pot (well, I washed and dried it first).  Garlic, onions, shallots, carrots, a tomato and some crimimi mushrooms.

They cooked until softened, and then I added a cup and a half of beef stock and a cup of merlot.

All of this reduced in the pot for about 20 minutes.  Then I strained the liquid into a smaller sauce pan, added another cup of wine, and reduced it again.  After it was reduced to about 1 cup in volume, I took it off the heat and whisked in about 2 tablespoons of butter, to thicken the sauce and give it a smooth texture. 

In the mean time, the steak got some salt and pepper on it.  The steak had been sitting out during all of the other prep work to come up to room temperature.  This is important, because it was a pretty thick steak, and by getting the whole thing up to room temperature first, we can get the center of the steak at a safe temperature (160 degrees F at minimum) without charring the heck out of the outside.


The steak went onto the grill.  3 minutes on side A, then 3 minutes on side B.  3 more minutes back on side A to create the hashmark grill pattern.   During that time the gratin came out of the oven.
It had to rest for 15 minutes or so to allow the sauce to thicken.

Then the steak came off the grill.  It also had to rest to allow the juices in the meat to redistribute.  When the meat is on the fire, all of the liquids get as far away from the heat as possible, which is the center of the cut.  By resting the steak, the whole cut equalizes in temperature, and the liquid redistributes throughout the meat as well.


Earlier in the day, I'd made a compound butter out of butter and chives.  Just mix them up, roll into a cylinder in plastic wrap and refrigerate.

The meat got sliced thin, a slice of the herb butter on it, and then some of the red wine sauce.  The gratin was simply sliced and put on the plate.  Served along side some roasted squash and onions and some caramelized onions and mushrooms, it looks something like this:


For the Steak
Steak
Salt
Pepper

For the Gratin
3 lbs Yukon Gold potatoes
3 cups cream
1 tsp salt
1/4 tsp pepper
dash nutmeg

For the Sauce
 2 cups red wine
1.5 cups beef stock
1 lb carrots, chopped
1 onion, chopped
2 large shallots, chopped
3 cloves of garlic, minced
1/2 pound chopped crimimi mushrooms

Monday, August 29, 2011

Buttermilk Pancakes

Tell somebody that you're going to have a slice of cake fried in butter for breakfast, and they'll probably call your cardiologist for you.  Tell them that you're going to have pancakes for breakfast, and they'll pull up a chair.  Its all in the presentation.

There are lots of shortcuts to pancakes.  You can buy a mix, add some eggs, possibly some water and some oil, and make pancakes.  Heck, you can even buy spray pancakes now!

Delicious, no?

While you could make quick pancakes out of a can, and even possibly survive eating them, I've tried these.  They're not food.  Pancakes should be soft and pillowy. 


Pancakes are assembled using what is called the 'muffin method'.  In the muffin method, all of the dry goods are combined in one bowl, all of the wet goods in another bowl.  Then the wet gets poured into the dry.  I've read recipes that instruct the cook to add the dry to the wet.  What happens when you do this?
Like this, but with more flour


For the dry goods, we're using flour, baking powder, baking soda (double acting), salt and sugar.  Usually sugar goes in with the wet goods, but we're making an emulsion with eggs later, and sugar likes to steal water away from things.  So the sugar stays dry.


I weigh all of my dry ingredients.  Its impossible to scoop out even cups of flour.  Try it some time.  Get a bag of flour, a 1 cup measuring cup, and a scale.  Scoop out equal cups and weigh them.  Chances are your amounts will vary by up to 20%.  Weight, however is constant.  And since grams are a smaller unit of measure than an ounce, I weigh everything in metric units.  All of the dry goods get whisked together.  I have yet to find a sifter that doesn't clog, make a mess and eventually lead me to a blinding, white-hot rage.  So I use a whisk to get rid of any clumping and to evenly distribute all the dry stuff.

Next we start the wet ingredients.  Melt half a stick (4 Tablespoons) of butter in the microwave and set it aside to cool.  Crack 2 eggs into a medium bowl.

Eggs are incredible.  The yolk is almost completely made up of fat and the white part (the albumen for you Jeopardy fans) is almost completely water.  We all know that oil and water don't mix.  Unless, of course you have an egg on hand.  Eggs create emulsions that let us mix oils and water.


There's so much lecithin (the emulsifier) in eggs that we can add more fat and more water to the mix and it won't break.  In our case, the 4 oz of melted butter and 2 cups of room temperature buttermilk.  I can only find fat free buttermilk in our stores, but some day I will get the real stuff which still contains traces of butterfat.  These additions are drizzled slowly while whisking and we get a homogenized emulsion.  Which really sounds much more scientific than it needs to.


Do you wet goods take dry goods to be your lawfully wedded ... um ... Spouse?

Perfectly legal union in the state of NY.

The wet goods, as we said above get poured into the dry goods

Now it's time to mix.  The goal here is to mix things just until they come together.  We don't need to get rid of every little lump.  Overmixing will produce gluten.  And while many fad diets will tell you that gluten is bad for you, and probably has led to the global recession, unless your doctor has told you to avoid it, the real reason we don't want gluten here is that it makes the final product chewy.  We want pillowy, so mix just until things come together using a rubber spatula or a whisk.  If you wanted to make additions to the pancakes such as fresh blueberries, chocolate chips, or toasted walnuts, nobody would hold it against you, and now is the time to do so.


Yes, there are lumps.  No, I'm not worried.  The liquids will work their way into the flour as our batter rests.  And rest it must!  The batter should rest for a good 10 minutes or so.  Not only to let the liquids disperse, but also to relax any gluten that we've formed (we can't avoid it all together), but also to let the acids in the buttermilk produce bubbles when they react with the baking soda and baking powder.  This process, where bubbles develop is called leavening.  And there's more to come.

While the batter is resting, melt a small amount of butter in a big nonstick pan, or on a griddle.  Use a paper towel to rub the pan with the melted butter.  We have a lot of fats in our batter, so we don't need a ton in the pan.

After the butter is melted and the batter is rested, it is time to cook.  I use a disher to scoop the batter into the pan.

 Cook the pancakes on one side until you see bubbles popping on the surface.  Now that we've added heat to the equation, the baking powder is working again.  If you look at your can of baking powder, it probably says, "Double acting" on it.  The first leavening begins when the powder reacts with an acid.  The second leavening happens when heat is applied.  This is how we achieve thick, fluffy pancakes.

Carefully flip with a plastic spatula, and cook on the other side until golden brown.

Most likely nobody needs to be told how to serve pancakes.  But just in case...

Ingredients
270 grams all purpose flour
42 grams granulated sugar
6 grams kosher salt
5 grams baking powder
4 grams baking soda

2 large eggs, beaten
4 Tablespoons butter, melted and cooled
2 cups buttermilk at room temperature

Saturday, August 27, 2011

Macaroni and Cheese


Boil the pasta.
Drain
Add the butter
Then the milk
Then the cheese powder


Its mac & Cheese time!

Well, not exactly like that.  Tonight for dinner we had pasta with a cheese sauce.  Two kinds of cheese made up the sauce.  Salty and hard Pecorino Romano, and creamy mascarpone.  I'm sure there are supposed to be accent marks and possibly an umlaut or two in those names. Please forgive me!

Rather than use elbows, I used rotini.  The tight spiral shape held on to the sauce really well.  I put a big pot of water on to boil.  In the mean time, I put about 1/4 cup of olive oil into a pan.  Since the oil is going to be a contributing flavor to the sauce, extra virgin olive oil is best. 

"What is the difference between extra virgin olive oil and plain ol' olive oil" you may ask. 

The oil hiding in olives isn't always easy to get to, and we've invented many ways to get to the oil.  Putting the olives in a press and squeezing them gets out some of the oil.  The oil that comes from this first press is extra virgin.  It retains the essential oils of the olive and tastes fruity.  Different regions of the world produce different tastes, and if you're lucky enough to have a specialty store around, they will let you sample.  You get to go in and just do shots of olive oil, and it is delicious!

There's still oil to be had in those pesky little buggers.  If you heat them and chop them up, you can get more of the oil out.  Heating them, however, destroys some of the flavor compounds in the oil and produces a less complex oil. 

So anyway, where were we.  Oh yes.  Olive oil in pan.  Also into the pan go 2 big cloves of garlic flattened with the side of a knife.  We'll be taking them out later, so no pressing, chopping or grating is needed.

Once the pasta water is boiling, salt it.  This is the only way to get flavor into the pasta.  Use a lot of salt.  The pros will tell you that your pasta water should taste like sea water.  I always burn myself trying to find out. 

The pasta cooked most of the way while in the other pan, the garlic got evacuated after it started to brown.  Now we have hot garlic oil in the pan.  The garlic oil was used to saute a mix of spinach and arugula.  Once that was wilted, a cup and a half of shredded pecorino romano and about 1 teaspoon of freshly cracked black pepper joined the fun. 

I reserved about 3/4 cup of the pasta water and drained the rotini.  In a medium bowl, I whisked the pasta water and the masacrpone to make a sauce.  The pasta, the sauce and a pinch of salt (about a teaspoon) all jumped into the fray with the greens and pecorino.  The pasta finished cooking while tossing in the sauce. 

The end result was delicious, and honestly did not take much longer than the Big Blue Box.

Ingredients:
1 lb rotini pasta
8 oz mascarpone cheese
6 oz pecorino romano, grated
5 oz spinach and arugula mix
1-2 teaspoons cracked black pepper
Salt

Saturday, August 20, 2011

Farmer's Market

We went to the farmer's market this morning and picked up a massive zucchini for $1.  For dinner we had spaghetti and I fried the zucchini after dredging in a mixture of flour, salt, pepper, bread crumbs and parmesan cheese.

Here is the result:

With fresh basil from the garden, of course!

Monday, August 15, 2011

Suburban Herbin' Part 1 - Mint

I grew some herbs this year just for kicks.  I did basil, rosemary, chives and mint.  Defying all odds, I actually managed to screw up growing chives.

My mint crop was pretty decent though.
I used essentially all of my mint crop this year to make ice cream.  There's something very satisfying knowing that the delicious night-time snack you're having came from plants you grew yourself!

Guacamole

Every once in a while I throw together a quick guacamole to have with our chips and salsa.  Since I was making pork tacos, it seemed like a good idea to make some.

I don't really measure anything.  I use avacado, garlic, cilantro, lime juice, jalapeno and salt.
Wave the 8" chef's magic wand over the ingredients and you get this!
Mash up the avacados in a bowl (cut them up last to avoid browning).  Then squeeze in the juice of about half a lime, mix in the rest of your ingredients, and you have guacamole.

Pickled red onions

There are a couple of different methods of pickling foods, hot and cold.  Both involve water and salt (a brine), and flavorings. 

I wanted pickled onions for my pork tacos.  I sliced a large red onion thinly and tossed it into a pot with 1/4 cup of cider vinegar, a tablespoon of sugar, a couple tablespoons of kosher salt, and enough water to cover.  I heated it up on the stove until all the sugar and salt disolved, then put the lid on until everything was cooled.


Pickling them got rid of a lot of the astringency, but left a nice onion-y flavor.

Mexican't or Mexi-CAN?

We were working on some cupcakes last night, and as Amy was adding the sour cream to the cake batter, she mentioned that Mexican food sounded good.  As is often the case she was 100% right.  To further solidify that it was time for Mexican food, I received a piece of mail addressed to my given name John Juarez.

So today is Taco Day!

Everybody knows what that means.  Ground beef, a packet of sodium and MSG, and some delicious orange cheese food product.

Not this time.

These are Braised Pork Butt Tacos.

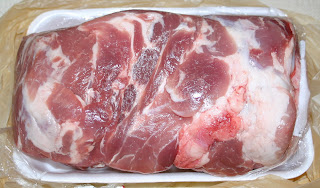
Pork butt, as you might suspect comes from the shoulder of the pig.  Yep, right behind the head.  So why is it called Pork butt?  Well, back before modern refrigeration, meat (and especially pork) would be packed for transit in big barrels called butts.  The name somehow stuck to the pork shoulder cut so now we have a pork butt that is really a shoulder that 100 years ago used to be packed in a butt.  Yum!

As you can see, the pork shoulder is marbled with a lot of fat.  Large amounts of fat dictate that we cook our meat "low and slow."   This will allow the meat to come up to temp evenly, allow the fat to melt and baste the meat during cooking, and allow the connective tissues in the meat (that is, the tough, gnarly bits) to absorb a lot of moisture and convert from stringy collagen to lip-smacking gelatin.

In order for this conversion to happen, we need to add lots of moisture.  Water is one option, but is rather lacking in flavor.  So we'll use something even better than water...BEER!


Step one is to stem and seed some dried chilies. 2 Chilie de abol and 4 dried ancho chilies.

Chop the stems off, cut them down the middle and dump out the seeds.

Then cover the chilies with boiling water and weigh them down with a bowl or plate to keep them submerged for about an hour.  After they've rehydrated, put the chilies, a tablespoon of lime juice, a couple tablespoons of sugar and a good pinch of salt into a food processor and rev it up.  Slowly drizzle in some of the liquid the chilis soaked in until everything combines into a thick paste.

The pork butt and the paste go into a gallon size ziplock with as much air removed as possible.  Then its time to rub your butt.  Rub it good, get the paste all over your butt, then stick it in the fridge.


My butt was in the fridge overnight.  Probably a total of 15 hours or so.

I pulled my big, chilie covered butt out of the fridge to come up to room temperature.  In the mean time, chopped a red onion and a few cloves of garlic.  These went into hot oil with some cumin, allspice, oregano, corriander seed and a couple of bay leaves.


Everything sauteed until the onions were soft, then in went beer.  One bottle of dark beer.  I used a wooden spoon to scrape all the yummy bits off the pan and stir them into the liquid.  Fancy cooks call this deglazing.

Once everything came up to a boil, I stuck my butt in the pot.
The lid went on and the I stuck the pot, butt and all into the oven at 300 degrees F.  At this point it's important to review the owners manual of your new oven to make sure that you don't accidentally shut it off after the first hour of cooking.

I basted the pork every hour for 3 hours.  In the mean time I sliced some radishes, toasted some corn tortillas, chopped some cilantro, made some guacamole, pickled some red onions and put all of the accoutrements into bowls.

The traditional construction is a tortilla with the meat, onions, radishes and cilantro.